
Intro
When new technologies start gaining momentum in the Android community, the pragmatic (or lazy) among us eventually have to ask ourselves, “Is it worth it?” After the initial arrival and departure of the hype train, some of these become trusted tools we use in almost every app. Think RxJava and Dagger.
React Native may be on its way to earning a place in the same club. Once we get past the fact that JavaScript on Android and HTML in JavaScript seem pretty damn weird at first, there’s a lot to like. Seeing your changes on a device almost instantly is a love-at-first-sight kind of thing. And rethinking your app architecture as a series of actions, state changes, and UI render phases can eliminate a surprising number of silly bugs.
A dive into every new technology starts with the flashy “type these commands and run your ‘Hello World’ app” tutorial. This is not that kind of post. Instead, I’ll recap my experience digging into React Native for real world use. From integrating RN code into an existing Java/Kotlin app to dealing with the kind of problems they never mention in the README, I’ll cover what you need to know to decide if React Native is really worth your time.
Why React Native?
As I see it, there are four reasons why you might want to consider using React Native:
- Fast Iteration - Hot reloading enables fast iteration as changes show up on an emulator instantly.
- Cross Platform - Much of the code can be shared between Android and iOS.
- Dynamic Code Updates - React Native is unique it its ability to push updates to devices without requiring an app release.
- Learning Something New - Web developers want to build mobile apps and mobile developers want to learn about web development. And some (like myself), want to ease back into web development after focusing on mobile for the last several years.
React Architecture
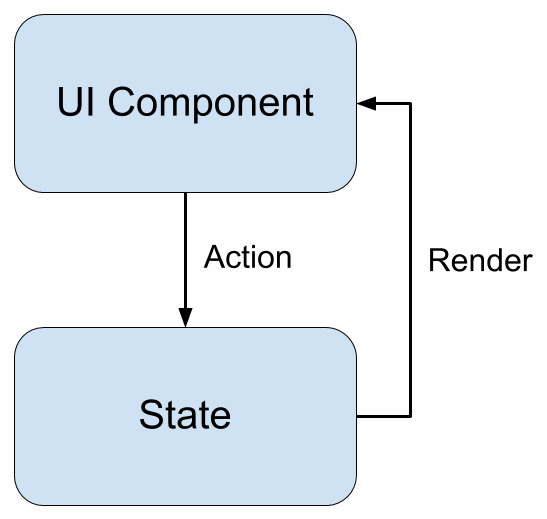
These days, most large Android apps either adhere to the MVP or MVVM architecture. Models, state changes, and UI logic are kept separated. But how and when the UI is updated is largely up to us to decide on a case by case basis. With React, these decisions have been made for us. Our UI is driven by state changes and that’s pretty much it. State is a first class citizen and the UI is rendered anytime it changes. By breaking the UI into components with a unidirectional data flow, code is organized into small, reusable building blocks following a well defined pattern:
Sample App
Let’s look at a small sample app to help visualize how things fit together:
import React, { Component } from 'react';
import {
  AppRegistry,
  StyleSheet,
  Text,
  TextInput,
  View
} from 'react-native';

export default class SampleApp extends Component {
  constructor(props) {
    super(props);
    this.state = {name: ''};
  }

  render() {
    return (
      <View style={styles.container}>
        <TextInput
          style={styles.textInput}
          placeholder="Enter your name"
          onChangeText={this.setName} />
        {this.state.name.length &&
          <Text style={styles.greeting}>
            Hello, {this.state.name}!
          </Text>}
      </View>
    );
  }

  setName = (name) => {
    this.setState({name: name});
  }
}

const styles = StyleSheet.create({
  container: {
    padding: 16
  },
  textInput: {
    marginBottom: 16
  },
  greeting: {
    fontSize: 24,
    fontWeight: 'bold'
  }
});

AppRegistry.registerComponent('SampleProject', () => SampleApp);
At the top of the file, we import the components we want to reference in this file. First we import some React classes, followed by the React Native classes we’ll be using.
Below that, we declare a SampleApp component that extends React’s Component class. Our constructor takes a map of properties passed from the parent, and calls through to super(). Then, we initialize our state map with an empty string for the greeting we’ll be displaying.
If nothing else, most components will have a render() method. Here, we use a hybrid of HTML and Javascript known as JSX to return the view we want to render. In this case, we’re rendering a text input and a greeting based on the value of this.state.greeting, or nothing if no text has been entered.
Any changes to the state map cause the render() method to run again. As we type in the text box, the greeting text is updated, which instantly updates the greeting text on screen. State management in React is almost as complicated of a topic as React itself, so I won’t delve into that here. Redux is currently the preferred state management container for large apps, but most intro tutorials will caution against using it until you get far enough with properties and the state map to encounter some of the problems Redux solves.
Below our SampleApp component, we define the stylesheet classes you see applied in the render() method. Most of the style attributes are the same CSS you’d use for the web (after converting from kebab-case to camel case). Dimensions specified here translate to dp on Android and logical pixels on iOS. Finally, we register our component with React Native, providing a name we can use to load it on the native side.
Integration with Existing Apps
Now that we have a basic understanding of how React apps are architected and how React Native brings that to Android, let’s talk about my experience integrating React Native into an existing app. I won’t cover setting up a new all React Native app from scratch, as there are tutorials and generators that make this pretty straightforward.
I started by following the Integration with Existing Apps tutorial on the React Native documentation site. In a nutshell, this involves running some yarn commands to pull down React Native dependencies, making a few build.gradle changes, and adding an Activity to load a “Hello World” Javascript file. There are several steps, but they’re pretty easy to follow. Then we run yarn start to bundle the Javascript (a step replaced by a pre-build task for release builds) and run our app. Simple enough, right?
Wrong. When I tried this using v0.45, I encountered my first problem. At that time, React Native was using OkHttp v3.4 and our app was using a newer version. Between those versions, there were several breaking changes that meant we could not simply force a newer version of the library. For those of you playing blog post BINGO, there’s your first Square library mention.
But, it’s open source. Surely someone else has had the problem and solved it, right? Correct! There was even a pull request open to update React Native to v3.8. Let’s take a look at a few key parts of the discussion:
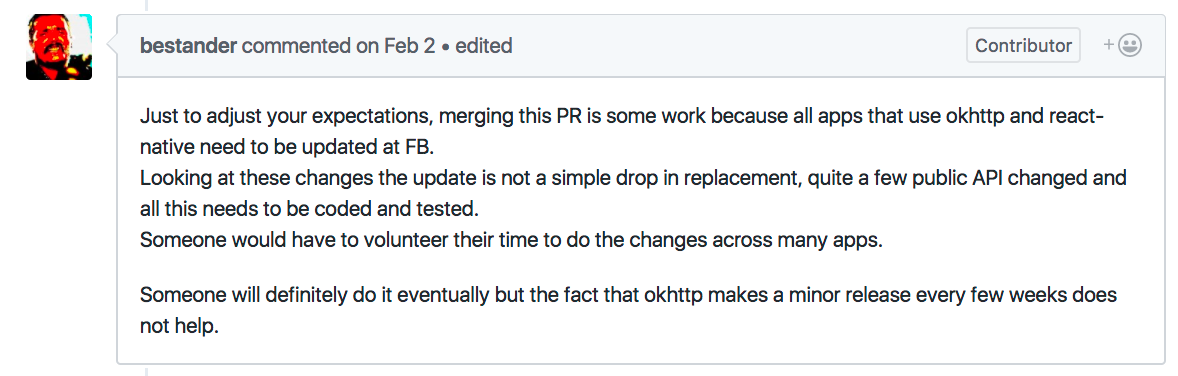
So, how might we proceed?


FOUR MONTHS after it was originally opened, the PR was merged. Problem solved? Nope!
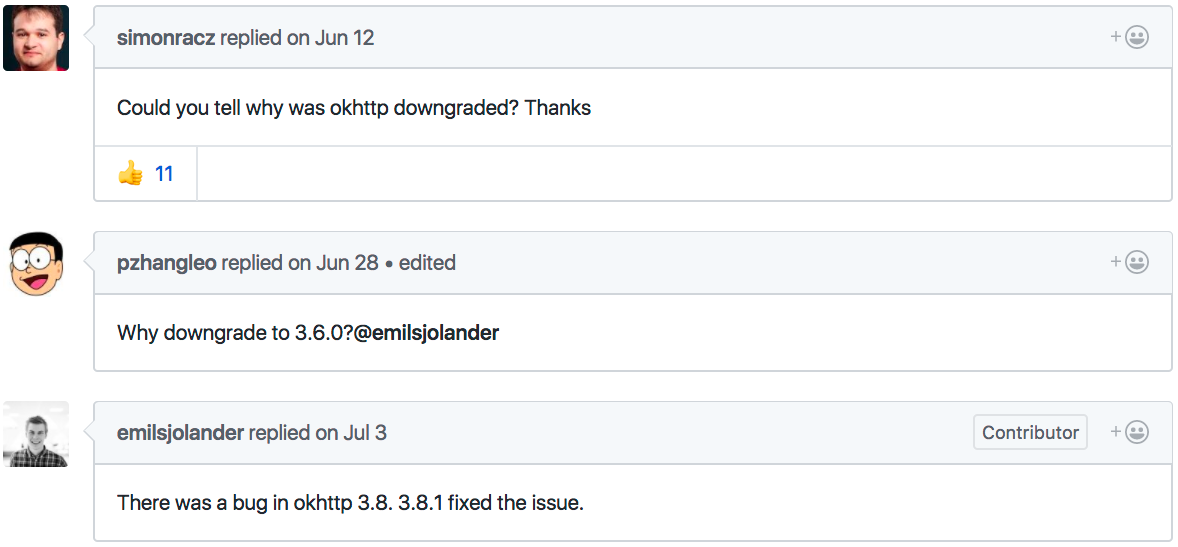
A couple weeks later, OkHttp v3.8 had an issue of its own that required React Native to downgrade to v3.6! What a rollercoaster!
I’ve since learned that there a few different ways to integrate React Native dependencies into an existing app:
- Add dependencies directly to your app - Unfortunately, this won’t work if your Android and iOS apps are in separate repos. Even if you’re cutting-edge enough to be using a monorepo, this approach means every developer on your team has to know about the React Native portion of your codebase.
- Package dependencies in a separate library - This seems to be the obvious alternative to the first option until you realize that React Native is distributed via NPM rather than standard native mechanisms like Maven/Gradle/Cocoa Pods. If you want to go this route, you have to package React Native itself and any libraries with native code manually along with your own React Native features.
- Electrode Native from WalmartLabs - I’ve spent some time with this and it seems to be the best option. The documentation is very thorough but it takes time and patience to set things up. I plan to share more about my experience soon, but suffice it to say it solves the issues with the previous two approaches in a way that should scale for large distributed teams (because Walmart).
The OSS License Drama
On top of the integration challenges, Facebook also recently clarified their position regarding the open source license for React Native. I’m no lawyer, but the license for Facebook open source projects makes them free to use with the stipulation that if you sue them for patent infringement, you lose the license. Does your company do anything that Facebook might do in the future? If so, this is essentially the old mobster line updated for the digital world:
Nice app you got there. It would be a shame if anything…happened to it.
There were plenty of rants online about this, while others don’t seem too concerned judging by conversations I had at a recent React Meetup in Berlin. The fallout even led to companies like WordPress ditching a nearly finished React rewrite for something less legally volatile.
Either way, this brings us to our first consideration when deciding to use React Native:
# It’s a big dependency and may limit your ability to upgrade other libraries.
Large companies open sourcing things are more focused on their own needs (and rightly so) than the community of developers using their projects. Popular libraries also serve as a recruiting tool. Solving problems for others is a bonus.
Developing with React Native
Assuming you still aren’t deterred, let’s talk a bit about what it’s like to actually develop an app with React Native. First things first, you’ll need to pick an editor. While you could certainly use Android Studio to edit Javascript files, your best bet is to use a separate text editor that provides first class support for them. Both Atom and Microsoft’s VS Code are good choices with a lot of plugins available. I started out using Atom at first and later VS Code along with the Chrome Developer Tools for debugging. Be sure to pick an editor you’re comfortable with, as most of your React Native development will take place there rather than in Android Studio or Xcode.
Coming from Android Studio, most text editors leave a lot to be desired. Import statements must be added manually…like a caveman. Autocomplete is usually just an indexed list of words in open files unless you install some plugins. Most of the quick fix/refactoring tools we’ve come to rely on are typically not available (although VS Code is adding more and more with each update). This also means that syntax errors may not be apparent until you check the console (where your yarn start command is running) or try running your changes on a device. Thankfully, neither of these take anywhere near as long as waiting on a Gradle build to run and deploy to an emulator.
Much has been written about how inferior JavaScript is compared to other languages and yet here we are using it heavily more than 20 years after its initial release. jQuery made it more palatable for a while but has since been supplanted by ES6, which fixes many of its shortcomings. Even so, those of us coming from statically typed languages will likely prefer using Facebook’s Flow or Microsoft’s TypeScript to bring type safety to our React Native apps.
We’ve chosen TypeScript (side note, TypeScript vs Flow is akin to the VIM/emacs religious wars) for its first class support in VS Code. This gives us refactoring, go to definition and a lot of other IDE related features. Here’s a small example of a component using TypeScript:
export interface Props { }
export interface State {
  greeting: string,
  isBoolean: boolean,
  someCount: number
}

export default class SampleApp extends React.Component<Props, State> {

  sayHi = (name: string): string => {
    return `Hi, ${name}!`;
  }
}
Getting comfortable with React Native involves a learning curve similar to any large architectural framework like Dagger or language like Kotlin. For many, working with React Native means learning React and Javascript simultaneously.
Not-So-Great-Things
As you can see, developing an app with React Native requires learning quite a few new concepts. In addition, there are a few less-than-ideal things worth mentioning.
First, I was surprised to learn that there is currently no built-in way to save and restore state when handling configuration changes like an orientation change. This forces us to use the android:configChanges="keyboard|keyboardHidden|orientation|screenSize" hack we’ve all learned is not the right way to do this. Or, we could lock the app orientation to portrait. But I’m not sure which is worse.
What’s more, many standard Android things like Material Design widgets and language support require third party libraries. It’s great to see the community fill these needs, but an officially supported solution for some of the most frequently used platform features would be comforting.
When all else fails, interop with native code is possible, but requires some additional classes and configuration to define the interface between React Native and your JVM code.
This brings us to our second consideration:
# It’s way different than normal Android development.
If you have a team of React or Javascript developers and need to build a mobile app, this may be perfect. However, if you have a team of longtime Android engineers, React Native may be a tougher sell, especially with things like Kotlin going mainstream and increasingly better tooling.
Don’t Drive Too Fast
As I mentioned in the intro, one of the killer features of React Native is the ability to change code and see it on a device almost instantly. Or, to put a darker spin on it:
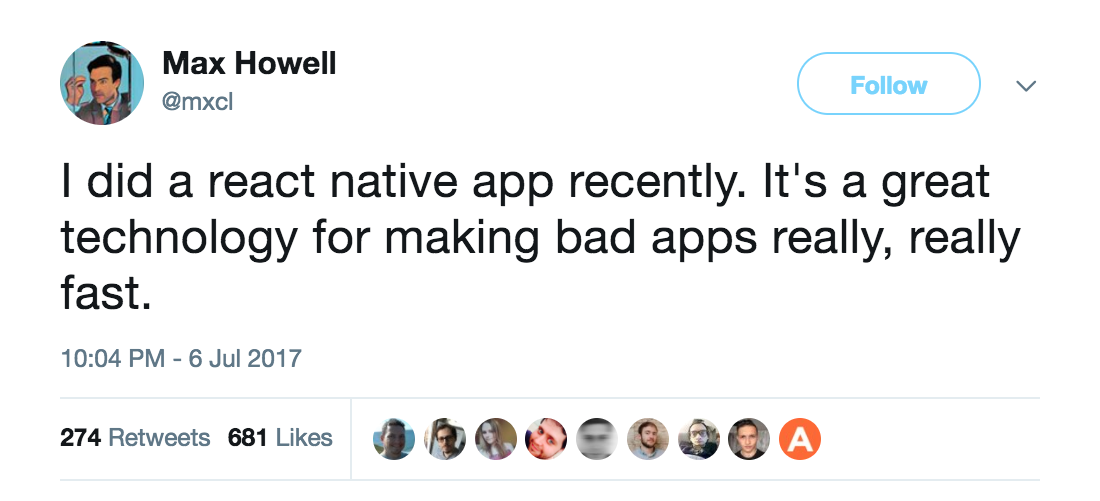 https://twitter.com/mxcl/status/883159808643395588
Trying to build too much too quickly with any technology before having a solid grasp of the fundamentals can lead to technical debt. Luckily, there are tons of great tutorials and books available to guide you.
One proven way to ensure quality code is to test as much of it as possible. There are a few frameworks that help us with this on React Native:
- Jest - Snapshot & unit testing. React Native apps have this configured out of the box.
- Detox - Espresso like UI testing. Also known as end-to-end or gray box testing, Detox runs your tests on an emulator so you can validate what the user actually sees.
- Enzyme - Shallow rendering means tests can run a bit faster than Jest with a more flexible API.
Cross Platform
Cross platform code sharing is also routinely mentioned as a benefit of React Native. While we’ve been able to have the same code run on both Android and iOS, things like keyboard behavior and platform specific styles often mean diverging at some point. Best practices for cross-platform code sharing are still evolving. How much to share and what is okay to duplicate are the two toughest questions here. As much possible, breaking functionality down into reusable components and differing only where necessary should give you the flexibility required to keep the app feeling native on each platform.
There are a couple ways to specify platform specific behavior. First, we can use a simple if (Platform.OS === 'android') check in our code, similar to how we conditionally handle OS version differences on Android. But sprinkling code like this throughout your app will make these important platform specific differences difficult to maintain. The second, slightly better option is to include the *.android.js or *.ios.js designation in your file names. By convention, files ending with *.android.js will be loaded by Android and those ending with *.ios.js will be loaded by iOS. If you are able to reduce platform-specific code to small components and minor style differences, this approach should work a bit better.
This brings us to our third consideration when deciding to use React Native:
# Clean and maintainable cross-platform code requires the commitment of everyone on the team.
Dynamic Code Updates
Another feature of React Native that is not available to traditional Android apps is dynamic code updates via Microsoft’s Code Push service. With Code Push, you can deploy updated Javascript code to your users without deploying a full app update to Google Play or the Apple App Store. This means bug fixes and new features can get to your users as quickly as possible. While this sounds too good to be true for anyone familiar with Apple’s stringent review process or anyone who’s received one of those scary automated terms violations emails from Google Play, the FAQ on the Code Push site assures us everything’s cool:
According to section 3.3.2 of Apple’s developer agreement, as long as you are using the CodePush service to release bug fixes and improvements/features that maintain the app’s original/presented purpose (i.e. don’t CodePush a calculator into a first-person shooter), then you will be fine, and your users will be happy. In order to provide a tangible example, our team published a (pretty cheesy!) CodePush-ified game to the Google Play Store and Apple App Store, and had no problems getting it through the review process.
So, while the official answer is “you will be fine”, it’s up to you to decide if the fact that they support their claim with a single piece of anecdotal evidence is enough for you to feel comfortable using it for your project.
I’ve only given Code Push a test drive so far, but it was enough for me to be simultaneously impressed and scared of how it could be abused in the wrong hands. The documentation does a good job of explaining best practices for deploying updates without surprising the user. In short, you should ideally wait for the subsequent app session to apply dynamic updates.
This brings us to our fourth and final point to consider before adopting React Native:
# Dynamic code updates are a game changer, but should be used responsibly.
A React Native UI with Existing Native Code
Since one of the primary benefits of React Native is how quickly you can see changes on a device, it’s great for rapidly prototyping a new feature. You can use this to get early feedback on an idea before investing the time to fully develop it natively. But what if you have an existing app with API and/or database code you don’t want to reimplement in Javascript?
As I said earlier, React Native allows us to interface with our native app code. Leveraging this, it’s not very difficult to use existing native code to drive a UI developed in React Native.
Here’s an example of how to connect React Native to LiveData, which Google introduced at I/O this year as part of the Architecture Components:
class BeerLiveDataModule : ReactContextBaseJavaModule {
  @Inject internal lateinit var repository: BeerRepository
  @Inject internal lateinit var gson: Gson

  private lateinit var liveData: LiveData<List<Beer>>

  // constructor/injection

  override fun getName() = "BeerLiveData"

  @ReactMethod
  fun subscribe() {
    liveData = repository.listBeers().apply {
      observeForever(this)
    }
  }

  @ReactMethod
  fun unsubscribe() =
    // must happen on main thread
    Handler(Looper.getMainLooper()).apply {
      post { liveData.removeObserver(this) }
    }

  override fun onChanged(beers: List<Beer>) {
    val map = Arguments.createMap().apply {
      putString("beers", gson.toJson(beers))
    }

    getReactApplicationContext()
      .getJSModule(DeviceEventManagerModule.RCTDeviceEventEmitter::class.java)
      .emit("beersChanged", map)
  }
}
First, on the native side, we create a BeerLiveDataModule that exposes a subscribe() and an unsubscribe() method to React Native. Both of these methods are annotated with @ReactMethod, which indicates that we want to expose them to JavaScript. When subscribe() is called, we start observing our BeerRepository’s LiveData. As you probably guessed, when unsubscribe() is called, we do the opposite. Any time LiveData emits an update, we post an event to Javascript via React’s device event emitter. You could certainly do something similar with RxJava as well.
Once we have our native module ready, we register it in our app’s ReactPackage class, which we created when we integrated React Native into our app.
Then, on the React Native side:
class BeerList extends React.Component {

  componentDidMount() {
    this.changeListener =
        DeviceEventEmitter.addListener(
          'beersChanged',
          this.onBeersChanged);
    NativeModules.BeerLiveData.subscribe();
  }

  componentWillUnmount() {
    this.changeListener.remove();
    NativeModules.BeerLiveData.unsubscribe();
  }

  beersChanged = (event) => {
    const beers = JSON.parse(event.beers);
    this.setState({beers: beers});
  }

  // ...

}
First, we add the corresponding listener and subscribe to our native module’s changes in componentDidMount(). In componentWillUnmount(), we once again do the reverse. Whenever we receive an event from the native module, we simply update the state with the new data and the view is rerendered to display it.
If you only need to asynchronously fetch data on the native side once, you can pass one or more callbacks from Javascript as a parameter to your native module method. Either way, with a bit of effort, you can start benefitting from React Native right away without having to rewrite your entire app.
Conclusion
So, is it worth it? It depends. To recap, here are some things to consider when deciding if React Native is right for you:
- It’s a big dependency and may limit your ability to upgrade other libraries.
- It’s way different than normal Android development.
- Clean and maintainable cross-platform code requires the commitment of everyone on the team.
- Dynamic code updates are a game changer, but should be used responsibly.
To be clear, I’m not saying you shouldn’t use React Native. I’m working with it now and (mostly) enjoying it. I’ve also talked to people at several companies who are successfully sharing JavaScript code between their React web apps and React Native mobile apps. And what’s more, it’s clearly gaining traction where tools like PhoneGap, Cordova, and Xamarin have not.